Annotations
Annotations let you point at elements instead of describing them in text. Click an element in the live preview, and Frontman captures its exact source file location, a screenshot, CSS selector, and surrounding context — then sends all of it to the agent alongside your prompt.
The result: the agent knows exactly which element you mean, which file to open, and what line to edit — no guessing, no searching.
Enabling annotation mode
Section titled “Enabling annotation mode”Click the cursor icon in the web preview toolbar to enter annotation mode. Your cursor changes to a crosshair, and elements highlight as you hover over them.
![]()
Click any element to annotate it. A numbered purple badge appears on the element, and a small popup opens below it where you can optionally type a comment.

To exit annotation mode, click the cursor icon again.
What gets captured
Section titled “What gets captured”When you click an element, Frontman immediately captures several layers of context:
| Data | Source | Purpose |
|---|---|---|
| Source file & line | Framework integration (Astro data-astro-source-* attributes, React fiber tree, or source maps) | Agent reads the exact file and line |
| Screenshot | Element-level capture via the preview iframe | Agent can see the visual state |
| CSS selector | Generated unique selector | Agent can locate the element in DOM tools |
| Tag name | DOM element tag (e.g., <button>, <h2>) | Provides structural context |
| CSS classes | Element’s class attribute | Helps identify styling |
| Component name | Detected from framework metadata (e.g., Hero, PricingCard) | Agent understands the component hierarchy |
| Component props | Extracted from framework dev tooling (Astro integration) | Agent sees the data driving the component |
| Nearby text | textContent of the element (truncated to 200 chars) | Gives content context |
| Bounding box | getBoundingClientRect() coordinates | Positional context for layout changes |
| Your comment | What you type in the annotation popup | Tells the agent what you want changed |
This all happens asynchronously in the background. The badge pulses while data is loading and turns solid purple when enrichment is complete.
Adding comments
Section titled “Adding comments”When you annotate an element, a small popup appears below it with a text input. Comments are optional but powerful — they tell the agent what you want changed about this specific element.
// Annotate a heading, then type:"Make this 48px and semibold"
// Annotate a button, then type:"Change the background to blue-600"
Press Enter or Escape to close the popup. The annotation stays regardless — comments just add extra instruction.
If you send a prompt without typing a comment, the agent still gets the full element context (file, screenshot, selector, etc.) and uses your chat message as the instruction.
Working with multiple annotations
Section titled “Working with multiple annotations”You can annotate as many elements as you need before sending a prompt. Each gets a numbered badge (1, 2, 3…) that the agent references as “Annotation 1”, “Annotation 2”, etc.
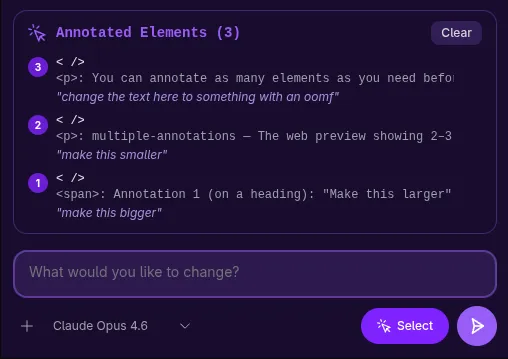
Independent changes — annotate each element with its own comment:
Annotation 1 (on a heading): "Make this larger"Annotation 2 (on a button): "Change the color to red"Chat message: "Apply these changes"Related changes — annotate the elements, then describe the change in the chat:
Annotation 1 (on card 1)Annotation 2 (on card 2)Annotation 3 (on card 3)Chat message: "Make all three cards the same height"The agent automatically decides whether to process annotations as independent tasks (creating a todo list) or as a single coordinated change.
Removing annotations
Section titled “Removing annotations”Click the numbered badge on any annotation to remove it. The remaining annotations renumber automatically.
Navigating the DOM tree
Section titled “Navigating the DOM tree”Each annotation marker has small ↑ / ↓ chevrons on its top-right corner:
- ↑ — replace this annotation with its parent element
- ↓ — replace this annotation with its first child element

This is useful when you click an element but realize you actually want its container (go up) or a specific child inside it (go down).
Freezing animations
Section titled “Freezing animations”When annotation mode is active, a timer icon appears next to the cursor toggle. Clicking it freezes all CSS animations, transitions, and videos in the preview.
![]()
This is helpful when elements are moving or transitioning — freezing them makes it easier to click the right target.
Click the timer icon again to resume animations.
How annotations reach the agent
Section titled “How annotations reach the agent”When you hit send, annotations go through this pipeline:
- Snapshot — each annotation is converted from a live DOM reference into a serializable record (dropping the element ref, keeping everything else)
- Package — annotations are sent to the server alongside your text and image attachments as ACP (Agent Client Protocol) resource blocks
- Enrich the prompt — the server appends an
[Annotated Elements]section to your message with the file path, line number, component name, CSS classes, comment, and other metadata for each annotation - Include screenshots — element screenshots are sent as image content parts so the LLM can see each annotated element
- System prompt guidance — when annotations are present, the agent’s system prompt includes specific instructions for the annotation workflow: read the file at the exact location, examine the source, apply changes, and verify
The agent is instructed to go directly to the annotated file and line — no exploring or searching. This makes annotation-based prompts significantly faster than text-only descriptions.
Enrichment status
Section titled “Enrichment status”The annotation badge color indicates its current state:
| Badge | Meaning |
|---|---|
| Purple (pulsing) | Enrichment in progress — screenshot and source location are being captured |
| Purple (solid) | Fully enriched — all data captured successfully |
| Amber | Enrichment failed — some data couldn’t be captured (the annotation is still usable) |
Source location detection
Section titled “Source location detection”Frontman uses a cascading strategy to find which source file and line corresponds to a DOM element, trying each method in order until one succeeds:
-
React fiber tree — for React-based frameworks (including Astro islands), Frontman walks the internal fiber tree to find component source information added by the React dev transform.
-
Vue 3 component instance — for Vue-based frameworks, Frontman inspects the Vue component instance attached to the DOM element to extract source file and location metadata.
-
Astro annotations — the
@frontman-ai/astroplugin capturesdata-astro-source-fileanddata-astro-source-locattributes that Astro adds in dev mode. It also captures component props from injected HTML comments. This happens before Astro’s dev toolbar strips the attributes. -
Timeout fallback — source detection has a 5-second timeout. If resolution stalls (e.g., CORS-blocked URLs), the annotation proceeds without source location — the agent still gets the screenshot, selector, and other context.
After detection, file paths are resolved from absolute to project-relative paths via the Frontman server.
Tips for effective annotations
Section titled “Tips for effective annotations”- Annotate before typing — click the element(s) first, then write your prompt. This keeps your workflow smooth.
- Use comments for element-specific instructions — if you have different instructions for different elements, put them in the annotation comments rather than trying to explain positions in the chat.
- Navigate with ↑ / ↓ — if you accidentally clicked a child
<span>inside a<button>, use the ↑ arrow to select the parent instead of removing and re-annotating. - Freeze animations for moving elements — carousels, loading spinners, and animated transitions are much easier to annotate when frozen.
- One annotation beats a paragraph — “Make this blue” with an annotation is faster and more precise than “Change the color of the third button in the second row of the pricing section to blue.”
Annotation-only messages
Section titled “Annotation-only messages”You can send a message with only annotations and no text. The agent will examine each annotated element and ask what you’d like changed — or if your annotations have comments, it will use those as instructions directly.
Next steps
Section titled “Next steps”- Sending Prompts — how to write effective prompts alongside annotations
- The Web Preview — navigate your app and test responsive layouts
- Tool Capabilities — what browser tools the agent has access to
- Prompt Strategies — advanced iteration and chaining patterns